<--! Code Locks, locker code Locks, digi locks -->

No Need to hassle with Keys!

Live Chat Software
 

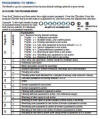
Instructions for Code Locks


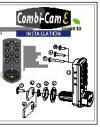
The MiniK10 is simple to install and offers flexible options in installation.   Below instructions are divided into

Single User Instructions

Basic Installing of the Lock

Programming the Lock

Setting the Lock to One Time Use (Locker) Mode
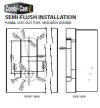
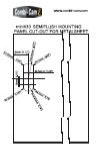
  electronic code locks
Basic Installation

Below are the basic install instructions.  These instructions go into more detail than the printed instructions. See the side bar for more details and other installation
documents.
code locks

CAUTION:  Do not over-tighten nuts or screws. Do not use an electric screw gun during installation unless equipped with a torque adjuster. The maximum torque on the cylinder nut is 25Nm.
 

cabinet code locks
Basic Installation Instructions

Combination code locks
New Install Instructions

Electronic code locks
Semi-Flush Wood Mount


NOTE:  Test lock 
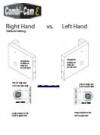
combinations before installing

Replacing Existing Lock

  1. Drill mounting holes.  Using the supplied template in the box, center the cylinder hole on the existing hole. If the existing hole is larger, you will be using the adaptor (2).
  2. Install lock (1) and adaptor (2) on back side if necessary and thread on the cylinder nut (3).
  3. Install mounting screw (8-10).  Three are provided for various material thicknesses.  (Tightening a longer screw than intended for the thickness can cause damage to the lock).
  4. Tighten both the cylinder nut (3) and the mounting screw (8-10)
  5. Confirm the stop cam position is correct for your application.  By factory default, the stop cam is positioned for right-handed doors ((lock on left, hinges on right).  More on RH/LH
  6. Select the appropriate cam  (5-6) for the application and install and tighten the cam screw (7)

New Installation

  1. Place the supplied template in the box. You can also use these more detailed instructions.
  2. Drill mounting screw and cylinder holes.
  3. Proceed with steps 2-6 above.
  4. Test lock combination before installing.

Other Installations

  1. Semi-Flush Wood
  2. Semi-Flush Metal
 

electronic locker locks
Semi-Flush Metal Mount
for


WARNING- California Residents- (Proposition 65) Locker Locks
Code Digital Locks
Right Hand vs Left Hand on Digital Locker Locks

Programming Locks Code
Electronic code locks

USAGE:

The Combi-CamE can be used in three different formats –

  1. User code
  2. Service code- By default this is not active
  3. Master code

The user and master codes should be changed prior to installation.  Write down new codes and keep in a safe place.  It is impossible to open lock if you forget codes.


OPENING WITH USER CODE:    Factory Default - <1-0-1-0>

Enter your 4-digit user password.  Initially, factory user code is <1-0-1-0>.  Rotate handle within 5 seconds to opening direction.  You will get a confirming beep from the lock.

 CHANGING USER CODE:

When individual usage is selected in program menu, press * button and enter current 4-digit user code.  Press * button again, enter new 4-digit user code.  Press * button again, approve new code.  Will get Confirming beep and the green LED light will flash.


OPENING WITH SERVICE CODE:  Default - <1-0-1-0-1>

When service code is selected in program menu, press * twice, enter current 5-digit service code.  Press * button once more, enter new 5-digit code.  Press * button again, rotate handle within 5 seconds to opening direction.  Will get confirming beep from the lock and green LED light will flash.

 CHANGING SERVICE CODE:

When service code in program menu is selected, press * button twice, enter current 5-digit service code.  Press * button again, enter new 5-digit service code.  Press * button again, approve new code.  Will get confirming beep from lock, green LED light will flash.


OPENING WITH MASTER CODE:  Default - <1-0-1-0-1-0>

Press * button, enter current 6-digit master code.  Press # button, rotate handle in 5 seconds to opening direction.  Will get warning beep from lock and green LED light will blink.

 CHANGING MASTER CODE:

Press the #button twice, enter the old 6-digit master code.  Press # button again, enter new 6-digit master code.  Press # button, approve new code – you will receive a confirming beep from the lock. 


GENERAL WARNINGS:

  1. Please read the manual before using lock.
  2. Be sure to change all default codes with new codes.
  3. Do not keep codes in the cabinet where lock is installed (yes, this has happened) !
  4. Impossible to open lock if you forget your user or master codes.
  5. Lock gives warning beep when wrong codes are being used multiple times
  6. Impossible to open front side of lock by breaking or trying to forcefully open lock.
  7. Use CR2450 3.0V Lithium batteries.
  8. Remember battery consumption is high when programs 2, 3, and 7 are active.

 LIGHT AND AUDIO WARNINGS:

Password is accepted:            Green LED lights with two              
                                                            repeated audio warnings

Wrong password:                      Red LED lights with four repeated
                                                            audio warnings

Low battery:                                Red LED lights flash 5 times after
                                                            each operation

Lock left open:                                   1 minute after door is  opened,
                                                             lock give audible warning eight
                                                             times every five seconds


PROGRAMMING:

ATTENTION:  Remember to write down your code after you program all operations.  Do not keep the code in the cabinet where the lock is being applied.  It is impossible to open the lock if you forget your code.

 Definition of the program menu and functions  Code Locks here.


ACCESSING THE PROGRAM MENU:

Press the # button and then enter the 6-digit master password.  Press the * button.  Press the program number that you will make an adjustment to, and then press the adjustment selection. 

Example:  #XXXXXX*  3 1  Turns on the feature if a wrong code is entered 3 times, the lock is blocked for 5 minutes.

The program menu for


WARNING- California Residents- (Proposition 65) locker locks here


MAINTENANCE:

  1. Clean the front of the lock with a mild damp cloth with detergent, if needed.
  2. Do not use any hard or scratching cleanser.
  3. Do not clean with chemical materials that melt plastic (e.g. thinner, acetone, etc.)
  4. Be careful not to spill water on the lock.

 CHANGING THE BATTERY:

The lock operates with a 3V lithium coin cell CR2450 battery.  The battery is located on the back side of the device.  Remove the cross screw located on the cover of the battery and replace it with a new one.  The battery life is up to 10 years.  The red LED light blinks 5 times after each operation.  It is possible to open and close the lock for 100-150 times after you get a low battery warning from the lock.

BATTERY OVERRIDE:

In the unlikely event that your battery runs out (up to 10 year life and up to 150 uses with warnings prior), click here for a simple method.


  Electronic Cabinet Locks
Programming Manual

electronic locker locks
Menu for Programming


WARNING- California Residents- (Proposition 65) locker locks


Definitions of How
to Code Locks

Video Using Lock


Video User Setting Password

Video Retrofitting Existing Lock
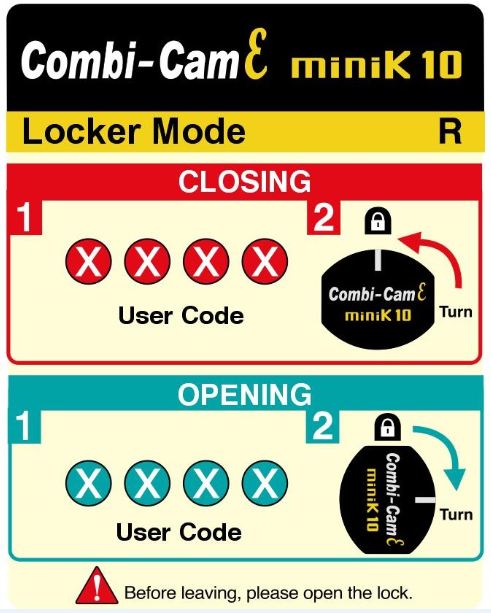
Electronic Cabinet Locks
RFID
Instructions

locker cam lock

Setting Code Lock to

One Time Use (Locker Mode)


The MiniK10 in One Time Use mode is great for gyms and other locker scenarios where multiple people are accessing the locker during the course of the day.  Similar concept to the hotel safe, when the lock is open, any code that is input by the user becomes the new code to open the locker upon their return.  Next user inputs their own number, etc.

By default, the MiniK10 is set up for individual mode. However, it can easily be set to Locker mode with the below methods:

  1. When the lock is new, while keeping the 1 button pressed down, pull the battery tab and count to three before releasing the 1 button.
  2. Enter in the master code and then program 11 as in below:
    #XXXXXX*1 1    (XXXXXX = current master code or if new, factory default is 101010) 
  3. It is that easy!
 

Video Programming Lock for One Time Use (Locker mode)


Video- Programming
One Time Use


Sitemap   | Home   | Features   | Instructions   | APPSRFID   | Specs   | Press  | Buy Combi-Cam E   | FAQs   | About Us
code locks

www.fjmsecurity.com